
Before creating custom shaders, let’s understand what shaders are!
In Flutter mobile app development, shaders are used to define custom visual effects and transformations on graphics and UI elements. A shader is a program that runs on the GPU (Graphics Processing Unit) and controls how each pixel of a rendered image or UI element is displayed.
Flutter provides the Shader class, which is an abstract base class for different types of shaders. The most commonly used shaders in Flutter are GradientShader and ImageShader.Shaders in computer graphics are programs that determine the lighting, darkness, and colour of objects in a 3D scene. They use GLSL (OpenGL Shading Language) to achieve this. In this blog post, we’ll explore how to create custom shaders in Flutter using GLSL.
GLSL is a programming language used to control the GPU and create custom visual effects and rendering. It’s similar to C and is specifically designed for real-time environments like video games and animations.
Now to create a shader in Flutter, we typically write code in GLSL. However, if you prefer to skip the GLSL coding part, you can choose whatever GLSL code you like and modify it according to your preference for your Flutter app. There is an online platform called Shadertoy, which allows users to create and share interactive shaders in GLSL. It provides a playground for experimenting with real-time graphics and visual effects, making it a popular resource for shader developers and enthusiasts.
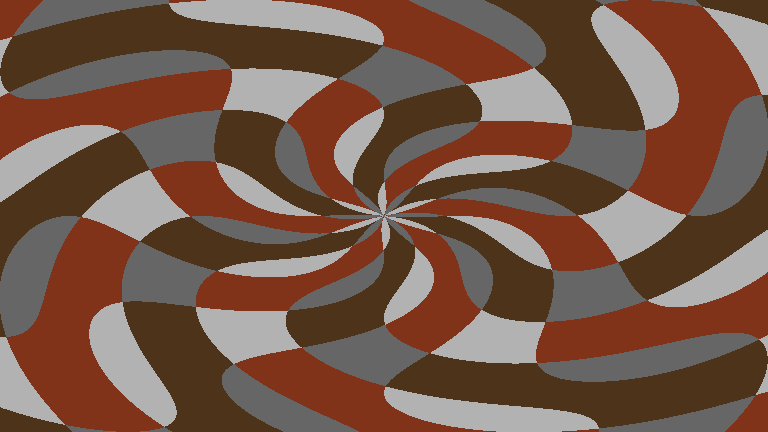
Here, I am using the following code to create my custom shader:
https://www.shadertoy.com/view/ctSSDR
Following code is the original shader from the Shadertoy website.
#define PI 3.1415926535897932384626433832795
voidmainImage( out vec4 fragColor, in vec2 fragCoord )
{
vec2 center = fragCoord/iResolution.xy – vec2(0.5, 0.5);
floatdist = length(center);
float p = (atan(center.y,center.x)) / (2.0 * PI);
floatnumStripes = 12.0;
boolstripeA = mod(floor((p * numStripes) + (sin(dist * 10.0 + sin(iTime)))), 2.0) == 1.0;
boolstripeB = mod(floor((p * numStripes) – (sin(dist * 10.0 + cos(iTime)))), 2.0) == 1.0;
vec3 col;
if (stripeA&&stripeB)
{
col = vec3(0.4);
}
else if (!stripeA&&stripeB)
{
col = vec3(0.5, 0.2, 0.1);
}
else if (stripeA&& !stripeB)
{
col = vec3(0.3, 0.2, 0.1);
}
else
{
col = vec3(0.7);
}
fragColor = vec4(col,1.0);
}
To get this code to work with Flutter, we have to modify the code as below:
#include
uniform vec2 uSize;
uniform float iTime;
vec2iResolution;
out vec4 fragColor;
#define PI 3.1415926535897932384626433832795
void main(void) {
iResolution = uSize;
vec2fragCoord = FlutterFragCoord();
// …
// …
}
The changes that we have applied are listed below:
Flutter runtime import is added
#include
Four new parameters are added
1. uniform vec2 uSize;
2. uniform float iTime;
3. vec2iResolution;
4. out vec4 fragColor;
All the mentioned variables, marked as “uniform”, need to be provided from Flutter when using the shader program.
The uniform vec2 uSize, which is a constant number provided from Flutter, represents the size of the item that is being displayed.
The uniform float iTemtracks the elapsed time since the shader started and is utilized to animate visual effects within the shader.
The vec2 iResolutionholds the screen resolution and is used to adjust the size and position of the rendered objects.
The out vec4 fragColorserves as the output variable that stores the final color of the rendered object. This value is subsequently passed back to the CPU for display on the screen.
Atlast, we have added two assignments within the main functionvoid main(void) {
iResolution = uSize;
vec2fragCoord = FlutterFragCoord();
// …
// …
}
FlutterFragCoord() will be received from the flutter runtime import.
Now, we have to save the full code in a “.frag” file and add it to pubspec.yaml so that we can utilize it in the flutter. Final code after customizing is as follows :
#include
uniform vec2 uSize;
uniform float iTime;
vec2iResolution;
out vec4 fragColor;
#define PI 3.1415926535897932384626433832795
void main(void) {
iResolution = uSize;
vec2fragCoord = FlutterFragCoord();
vec2 center = fragCoord/iResolution.xy – vec2(0.5, 0.5);
floatdist = length(center);
float p = (atan(center.y,center.x)) / (2.0 * PI);
floatnumStripes = 12.0;
boolstripeA = mod(floor((p * numStripes) + (sin(dist * 10.0 + sin(iTime)))), 2.0) == 1.0;
boolstripeB = mod(floor((p * numStripes) – (sin(dist * 10.0 + cos(iTime)))), 2.0) == 1.0;
vec3 col;
if (stripeA&&stripeB) {
col = vec3(0.4);
} else if (!stripeA&&stripeB) {
col = vec3(0.5, 0.2, 0.1);
} else if (stripeA&& !stripeB) {
col = vec3(0.3, 0.2, 0.1);
} else {
col = vec3(0.7);
}
fragColor = vec4(col,1.0);
}
Let’s apply the above shader into our flutter application!
Step-1 : To integrate above shader file into our application, we need to add that shader to flutter pubspec.yaml as mentioned below:
flutter:
shaders:
– shaders/shader.frag
Step-2: Then, we will create a ShaderPainter class which will extend CustomPainter as below:
import ‘dart:ui’;
import ‘package:flutter/material.dart’;
classShaderPainter extends CustomPainter {
finalFragmentShadershader;
final double time;
ShaderPainter(FragmentShaderfragmentShader, this.time)
: shader = fragmentShader;
@override
void paint(Canvas canvas, Size size) {
final paint = Paint();
shader.setFloat(0, size.width);
shader.setFloat(1, size.height);
shader.setFloat(2, time);
paint.shader = shader;
canvas.drawRect(Offset.zero& size, paint);
}
@override
boolshouldRepaint(covariant CustomPainteroldDelegate) => true;
}
Here, we are passing the below variables using setFloat on the FragmentShader:
shader.setFloat(0, size.width);
shader.setFloat(1, size.height);
shader.setFloat(2, time);
Step-3: Now, we will create a StatefulWidget called ShaderHomePage which reads the shader from the “.frag” file which we created above and passes it to the ShaderPainter as a FragmentShader.
import ‘dart:async’;
import ‘dart:ui’;
import ‘package:custom_shader_demo/custom_shader.dart’;
import ‘package:flutter/material.dart’;
classShaderHomePage extends StatefulWidget {
constShaderHomePage({super.key});
@override
State
}
class _ShaderHomePageState extends State
late Timer timer;
double delta = 0;
FragmentShader? shader;
voidloadMyShader() async {
var program = await FragmentProgram.fromAsset(‘shaders/shader.frag’);
shader = program.fragmentShader();
setState(() {
// trigger a repaint
});
timer = Timer.periodic(const Duration(milliseconds: 16), (timer) {
setState(() {
delta += 1 / 60;
});
});
}
@override
voidinitState() {
super.initState();
loadMyShader();
}
@override
void dispose() {
timer.cancel();
super.dispose();
}
@override
Widget build(BuildContext context) {
if (shader == null) {
returnconst Center(child: CircularProgressIndicator());
} else {
returnCustomPaint(painter: ShaderPainter(shader!, delta));
}
}
}
Here, the method which does all the work is loadMyShader.This method reads the shader from the assets, retrieves the FragmentShader from the FragmentProgram, assigns it to the shader variable, and also initiates a Timer for potential animation purposes.
late Timer timer;
double delta = 0;
FragmentShader? shader;
voidloadMyShader() async {
var program = await FragmentProgram.fromAsset(‘shaders/shader.frag’);
shader = program.fragmentShader();
setState(() {
// trigger a repaint
});
timer = Timer.periodic(const Duration(milliseconds: 16), (timer) {
setState(() {
delta += 1 / 60;
});
});
}
Output:
A beginner to custom shaders in Flutter should find the material in this description to be a thorough tutorial that will enable Flutter app developers to comprehend the procedure and begin building their own custom shaders.
We may also try to convert more complicated glsl code to use, which includes getting a picture from us and altering it pixel by pixel to produce amazing graphics. This essay simply demonstrates how to convert very simple glsl code to operate with flutter.


 Australia
 India
India Singapore
 United Kingdom
 Germany
 South Africa
 New Zealand
 Nigeria
 Canada
 France
 Spain
Spain Italy
Italy Ireland
 UAE
UAE